


COPYRIGHT © 2016-2026. The Owl Teacher | Privacy page | Disclosure Page | Shipping | Returns/Refunds
As I type this, I’m still reeling from the whiplash that is Michigan’s weather. Last Tuesday, we had a high of 74 degrees; the very next day, we couldn’t climb past 30 degrees and snow fell from the sky. In short, our seasons are CHANGING!
Okay, okay, I know it’s not just Michigan. Seasons are changing everywhere! Our rapidly changing seasons are likely here to stay, but even if they weren’t, your upper elementary students should still take the time to learn about season changes in order to satisfy NGSS as well as simply help them to explore the universe they live in.
Beyond simply understanding their universe, students should also be made aware of the “usual” seasonal patterns in order to identify signs of climate change that are likely to occur throughout their lifetime. In order to help combat global warming, we need to raise kiddos that are conscious of their environmental impacts.
The universe is huge and our place in it is not always clear. Thankfully, there are quite a few engaging activities you can employ in your upper elementary science classroom in order to help your students understand Earth’s place around the Sun, its changing seasons, and how they come to be.
Ready to take a trip around the Sun? Let’s jump in!
The Basics of Season Changes
As with every new science lesson, it’s important to provide students with an overview of the concept before diving in to the hands-on action. Since I’m so committed to saving you time, I’ll provide that overview here so you can get your lesson plans ready!
Season changes occur as the Earth moves around the Sun and are ultimately caused by the Earth’s vertical axial tilt. Without this 23.5° tilt, we would have no seasons–instead, every region would have roughly the same amount of sunlight throughout the year.
Thanks to this tilt, the Northern Hemisphere and Southern Hemisphere are on opposite schedules. When the Northern Hemisphere is tilted closer to the Sun, the Southern Hemisphere is tilted farther away; essentially, the Northern Hemisphere will be warmer (summer) while the Southern Hemisphere is cooler (winter), and vice versa.
As a result, winter days end up shorter, since regions experiencing winter receive less sunlight on a daily basis. Of course, we know that every day is always 24 hours, but due to the axial tilt, many more of those hours are spent in darkness during winter. The opposite applies to summer, too–summer days are longer because being tilted toward the Sun means you spend more hours in the light!
Of course, I’m sure you already know all of this; you’re a science teacher for a reason! However, students usually tend to have a few misconceptions about season changes, so it’s always best to go over the basics. For instance, it’s a common misunderstanding in upper elementary classrooms that winter occurs when the Earth itself is farthest from the Sun.
This misunderstanding is a great opportunity to introduce critical thinking into the classroom! As an opener to your season changes unit, encourage students to brainstorm what they think causes season changes and why. When the misconceptions come up, nudge students to explore those ideas. If you think about it, the Earth being farthest from the Sun couldn’t cause winter–otherwise, the entire planet would be experiencing winter at the same time, right? And we know that’s not true… Just look at Australia and its Christmastime celebrations. They celebrate Christmas on the beach during their summer!
Once your students have brainstormed enough ideas, create cause and effect chains! This activity is a cute way to help cure those misconceptions about season changes as well as engage the critical thinking skills that they’ll need to get through the unit. Now that your kiddos have grasped the basics, let’s take a look at a few hands-on ways you can demonstrate the season changes!
1. Simulate a Space Show
Ready to take your students to space?
Well, not really. But with how engaged your kiddos will be, they may as well be in space for real! For this activity, you’ll need to decide whether you want to provide a whole-class demonstration or break students up into groups to do their own demonstrations. You’ll need one flashlight, one pencil, and one spherical object that’s soft enough to stick the pencil (such as an apple) through for each group (or just one if you’re doing a whole-class demonstration).
To start, push the pencil through the ball CAREFULLY at approximately a 23.5° angle to represent the Earth’s vertical axial tilt. I would recommend doing this part yourself for each group… It’s just best to not give kiddos the opportunity for mistakes here. 😉
Once the tilt of the “Earth” has been established, move the Earth back and forth in a way that represents Earth’s northern and southern hemispheres moving closer and farther from the Sun (the flashlight) in order to create season changes. Emphasize (or let them notice!) that the equator always remains the same distance from the Sun. Then, bring in the critical thinking! If the equator is always the same distance from the Sun, what does that mean for the regions there? Is it possible that they don’t experience seasons?
That’s not all the critical thinking, either–here are a few more questions you can ask to encourage student-led inquiry:
- What is the same about the Earth’s axis as it moves around the Sun? What is different?
- How would seasons change if the Earth took longer to revolve around the Sun?
- Why are the seasons in places further from the equator different from the seasons at the equator?
There are plenty more questions out there, too. Allow students ample time to brainstorm ideas and think-pair-share with a partner to solve those questions!
2. Create a Seasons Model
With this activity, you can break students up into groups or simply have each individual kiddo work alone. If you’re forming groups, I recommend using tangible objects: you’ll need five Styrofoam balls (one yellow and four white, if possible), five toothpicks, and one foam plate for each group. If you’re having students work alone, however, it’s easier to simply provide four cutouts of an image of the Earth as well as one of the Sun in addition to the foam plate and five toothpicks for everyone.
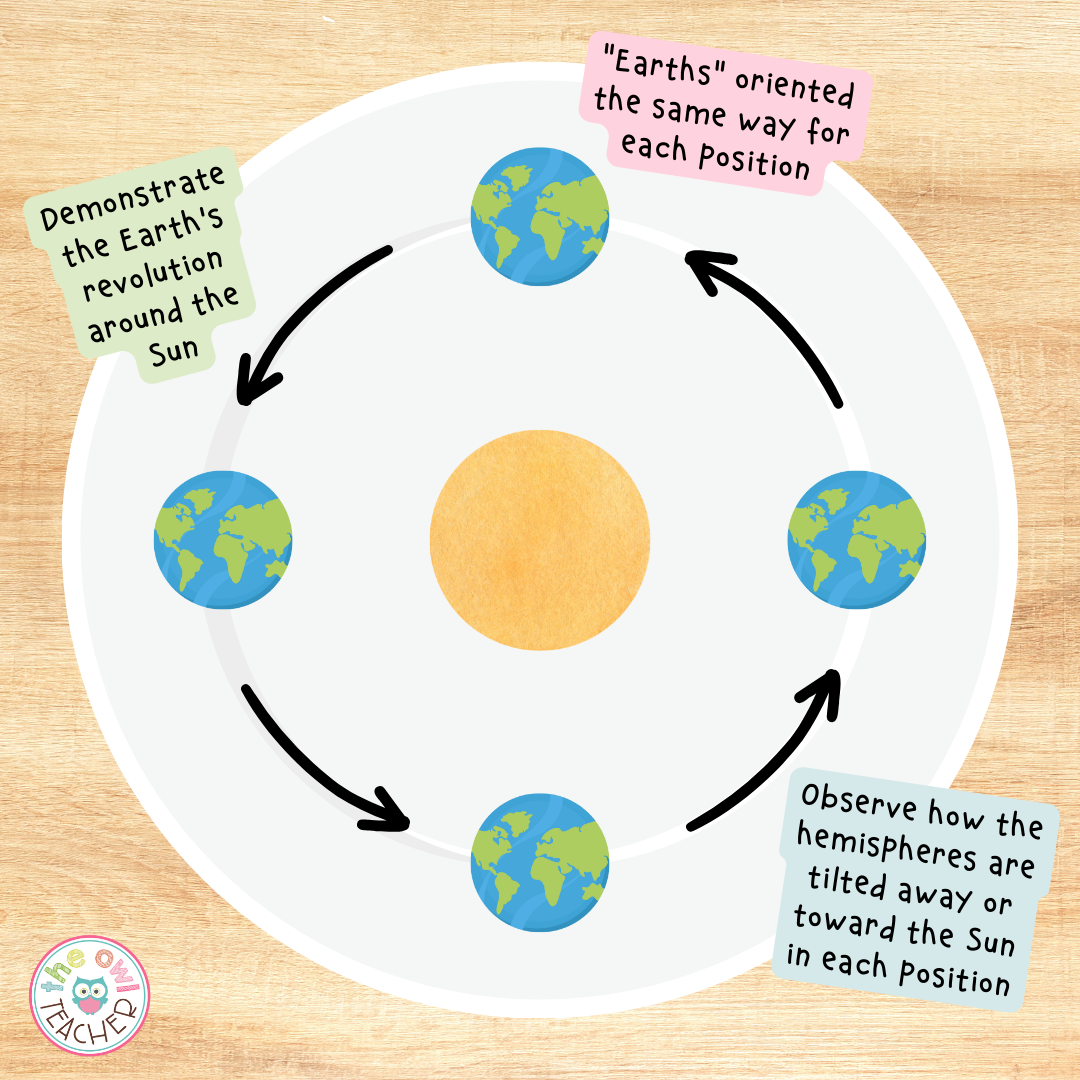
To get started, place the yellow Styrofoam ball (or Sun cutout) in the center of the plate and stick the toothpick through both the ball AND the plate in order to keep it steady. This ball is our Sun, so we don’t want it to go anywhere! Then, each of the four white Styrofoam balls (or Earth cutouts) should be placed directly above, below, and to the left and the right of the “Sun” in order to represent the position of the Earth during our four seasons.
Just like with the “Sun,” the “Earths” should receive the toothpick treatment in order to keep them adhered to the foam plate. However, with the “Earths,” try to insert the toothpicks at that 23.5° angle to represent the axial tilt! I also recommend labeling the Styrofoam Earths with marker where the northern hemisphere and southern hemisphere are. Bonus points for placing an “X” where North America should be on the “Earths!”
If you’re using the cutouts of the Earth rather than the Styrofoam balls, make sure every Earth is oriented the exact same way with the northern hemisphere at the top and the southern hemisphere at the bottom. This will help students see when each hemisphere is closest and furthest from the Sun, creating season changes.
Once everything is in place, rotate the plate around the toothpick centered in the “Sun” to demonstrate Earth’s yearly revolution and its axial tilt responsible for season changes. In addition, you can even rotate the individual “Earths” around their own toothpicks to show the way the Earth’s tilt interacts with the northern and southern hemispheres, causing season changes to be opposite for the two regions.
3. Around the World
Looking for new hanging mobiles to decorate your classroom? No worries: I’ve got those covered, and it comes complete with a lesson on season changes!
For this activity, print out large plate-sized black-and-white circles for students to color as the Earth (there are plenty of transparent Earth images available online). Then, every student should pick a unique country or region to research and mark it on their new maps.
It’s time to integrate technology! Allow students to conduct research on their chosen area by collecting temperatures from these places (such as through The Weather Channel) several times over a chosen year in order to see the range of conditions their area experiences. Students should also make note of weather conditions, type of precipitation, and so on in order to get the full picture of their region’s season changes!
As they collect information, students should write a brief summary of what their area’s seasons look like on the back of their circles. This summary should provide readers with a clear idea of the region’s seasons: how hot do their summers get? Do they get lots of snow in the winter? Does it rain a lot in the spring?
Once completed, students can share out their summaries to the rest of the class. Together, allow kiddos to compare and contrast their regions and engage critical thinking through questioning. Do regions near one another have the same seasons? Do regions along the same latitude have the same general season changes? What about regions along the same longitude?
Afterward, use a hole puncher to punch holes in the top and bottom of each Earth and string them together four or five at a time to hang up around the room. Students can enjoy the pride of displaying their work while you get to enjoy cute classroom decor!
4. Alien Adventures
If you know me, you know I LIVE for integrating curriculum, especially when it comes to incorporating writing into science lessons. That’s exactly what this next activity brings to the table!
This creative yet scientific exercise requires no resources on your part besides whatever materials your kiddos need to research a specific region of their choosing, such as tablets, laptops, or even the good old-fashioned library! Similar to the last activity, allow students to select an area or region, then reveal the task: write an interesting informational story about traveling with an alien!
In the story, the student should encounter an alien in their chosen region. The alien is confused–these season changes and weather conditions are like nothing they’ve seen before! They want to know what’s going on here on Earth, and luckily, your student is just the right person to explain this region’s season changes.
Like with the Earth mobiles, students’ stories should give readers an overview of the season changes their region experiences in a given year. Information to provide should include high and low temperatures, average precipitation, and so on. Remember: you’re explaining these season changes to an alien from a totally different planet!
Once their stories are complete, students can pair up and share their story with a partner. Afterward, take a few volunteers to read to the class! This is also a great opportunity to check for understanding.
5. Season Vocabulary Games
To round out our list, it’s the tried-and-true instant favorite: engage your science students with vocabulary games! From Jeopardy to the classic Quizlet, there are a plethora of vocabulary games to be found online that will elevate your students’ understanding of tough science concepts. In fact, I’ve even compiled a list of five science vocabulary activities that you can find here… And don’t miss the freebie at the end!
When it comes to season changes, there are plenty of options, too. You can put together vocabulary sliders, or even provide kiddos with a fancy set of season changes vocabulary games! These games cover twenty terms related to season changes and Earth’s rotation/revolution and include familiar games like “Bump!” “Shoot or Pour” (like Chutes and Ladders), and “Term Capture.” There’s so much variety in the set that your students are practically guaranteed to find something exciting!
Ultimately, the most important part of season changes vocabulary is to emphasize the difference between “revolution” and “rotation.” These terms are easily mixed up and can be confusing at first, but they’re vastly different and deserve the clarity!
Understanding season changes are vital to comprehending and appreciating the world around us. When we help students explore this important science concept, we help raise environmentally-conscious individuals who are aware of their impact on the planet as well as able to identify the warning signs of climate change.
However you choose to encourage student engagement with season changes, I’m sure you’ll do great! Win over their hearts and minds with hands-on activities that will leave a lasting impact… And just might make you teacher of the year, too! 😉
If you have more ideas, feel free to share them below, and make sure to sign up for my email list while you’re here. The only thing better than a few hands-on activities is getting those activities sent straight to your inbox weekly!

