Let’s be real: there’s TONS of growth in your classroom. Your kiddos–and you!–are both growing daily, and it can be difficult to keep track of it all! Thankfully, that’s where I come in to help.
Wait… Hang on a second. I’m getting word that I’m going on about the wrong kind of growth. Whoops! I was just really excited to compliment you on all the growth in your classroom! Instead of that, though, let’s take the time to add even MORE growth… Via plant growth cycles!
By now, all of my lovely, adoring fans should be fully aware of my history with plants. While I now have no quarrel with botany or plant growth, I spent a disproportionate amount of time looking at plants as boring, boring, boring thanks to one humdrum college course with a (un)remarkably monotonous professor who read straight from the textbook for an hour. An 8 AM class with Charlie Brown’s teacher? Yeah, no thanks. Hard pass.
Since then, it’s been my life goal to never, ever make a single student suffer such an offensively tedious lesson, especially when plants are involved. With all the good plants do for us, they certainly don’t deserve a bad rap!
When exploring plants with your upper elementary science students, there’s no doubt that it’s important to keep things engaging and fun for their sakes. In particular, plant growth cycles can be exciting for your kiddos, especially if done right. Examining plant growth cycles also provides an excellent opportunity to review plants’ needs for survival, and it’s also a great time to throw in a STEM project or two!
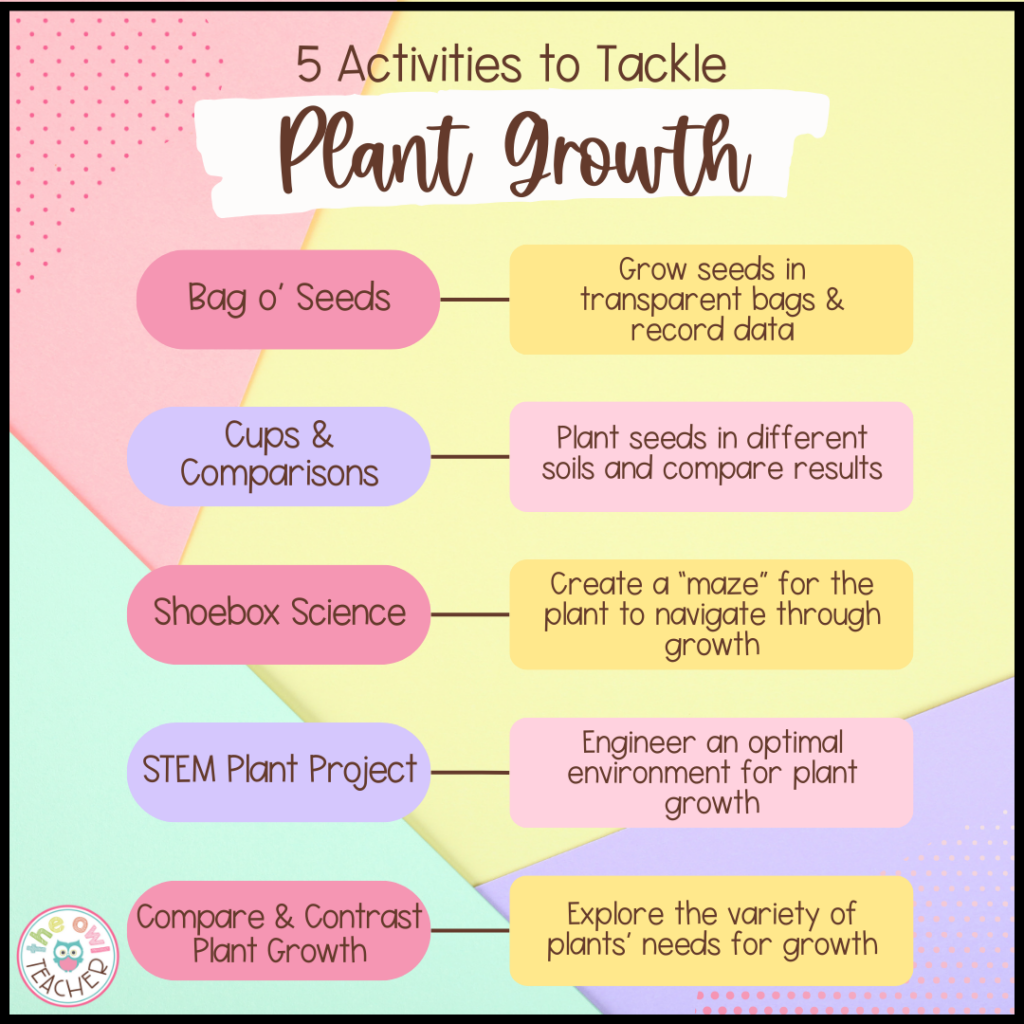
So how can you implement plant growth lessons into your science classroom while keeping your students engaged? It’s simple: introduce growth to your classroom! Let’s take a look at five hands-on activities you can implement ASAP to get the ball rolling… Or, I guess in this case, to get the seed growing!
Five Hands-On Activities to Tackle Plant Growth
1. Bags o’ Seeds (with Graphing!)
Let’s start with a classic plant growth activity that’s always a favorite: growing seeds in baggies! For this project, you’ll need a variety of seeds such as pumpkin, sunflower, millet, or anything that catches your eye. My main stipulation here is to ensure you have several different types of seeds that will grow at different rates in order to mix up the data students will collect.
To get started, students will “plant” their seeds in clear sandwich baggies lined with moist paper towel at the bottom. Depending on the layout of your classroom, you can either tape these baggies to a window or simply keep them under light in order to simulate growth conditions. The important part here is that the seeds germinate, and kiddos can observe and measure the plant growth through the clear bags!
As a bonus, students should also observe parts of the water cycle via condensation building up inside the baggie. Of course, that’s not the main focus here, but it’s always a great idea to integrate other science lessons wherever possible. You can integrate a touch of math here, too, by instructing students to measure their seeds’ growth every day or week to the nearest half- or quarter-inch. After a period of time, have students chart their findings into graphs and share with the class!
2. Cups & Comparisons
For another classic hit, try using plastic or Styrofoam cups to observe plant growth. You can have basic plant growth stations with simple soil, seeds, and water, or you can encourage your kiddos to engage in student-led inquiry by providing them with a question to solve: “Under what circumstances do plants grow best?”
Regardless of how you choose to employ this activity, provide students with cups and seeds as well as soil and water. If you’re looking to compare and contrast different growth environments, offer sand too! Several cups should contain just potting soil and seeds, while others should be only sand and seeds. There should also be cups that contain a half-and-half mixture of soil and sand to nurture their seeds.
Like with the baggies, students should observe plant growth in each cup at determined intervals. Clear cups are easiest to measure accurately, but Styrofoam cups are perfectly fine, too. Beyond seed sprouts, however, students can also (gently) uproot their plants at the end of the unit and investigate the roots that formed. How do the roots in soil differ from the roots that formed in sand? There are plenty of questions to be asked and answered here!
For another variable, try placing some seed cups in a dark area, such as a supplies closet, while other cups are left on a table in regular light. How does a seed’s environment influence plant growth? How can students apply their measured results to real-life scenarios? Obviously, they shouldn’t plant a garden in a dark, sandy cave on the beach, but why? That’s what they’re going to find out!
3. Shoebox Science
Since teachers make SO much money, it’s only natural that you can afford hundreds of pairs of shoes, right? Lucky for you, I have a great idea to put all those empty shoeboxes to use: by studying plant growth!
Before you come at me in the comments, don’t worry: I’m joking! Teachers definitely deserve waaaaay more than they’re paid! However, I’m not joking about using shoeboxes to explore plant growth with your students. The science here is real.
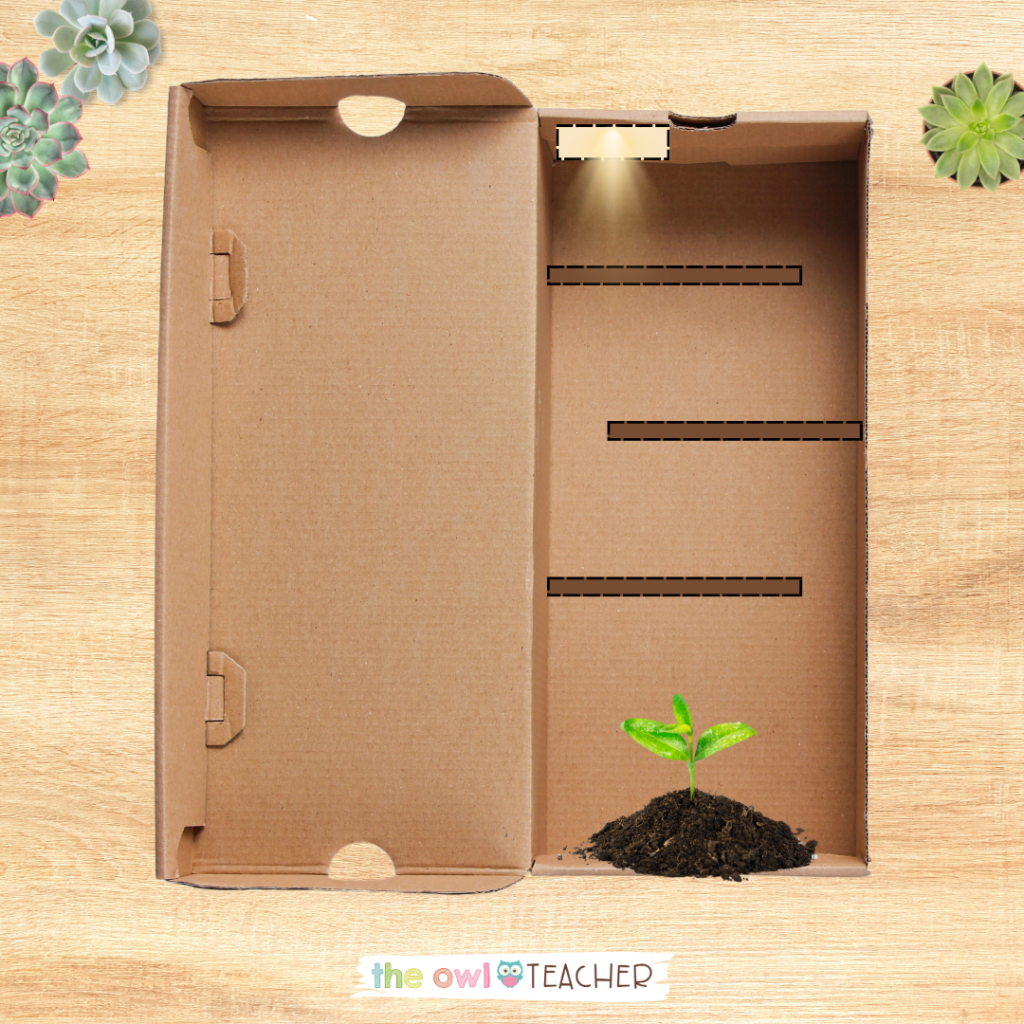
For this activity, you can use one shoebox for the whole class or use several shoeboxes and split your classroom up into groups. For each shoebox, cut a hole at one end to let in a small amount of light. Then, use cardboard rectangles as “dividers” inside the shoebox. These dividers should be placed horizontally in the box and adhere to one side of the box with masking tape while leaving about an inch of space on one side. Place the dividers in an alternating pattern so the shoebox looks similar to a maze.
Once your shoebox is set up, place a plant at the opposite end of the hole in the shoebox then cover the whole thing with the lid. Leave the shoebox somewhere where the hole is facing toward sunlight and check on the plant’s progress every so often. Ultimately, the goal here is to discover how plants respond if light is blocked. We know plants need light for photosynthesis, but how much control do plants have over their growth? Will they be able to navigate a maze to achieve maximum sunlight? It’s time to find out!
4. STEM Plant Project
Like you and I, plants have needs. Plant growth simply isn’t possible unless those needs are being met. Of course, those needs can be read about in a textbook, but unless your goal is to bore your science students, I would advise against that route! Instead, offer your students something a bit more hands-on: a STEM plant project!
Similar to my Plants’ Needs STEM Challenge, you can create a STEM activity of your own to explore plant growth. Gather a variety of containers, such as egg shells, baking tins, cups, shoeboxes, cereal boxes, and so on that students can choose from in order to engineer their own plant incubator. In order to spice things up a bit, give students further guidelines to follow, such as “the plant must have some sort of shelter to protect it from the elements.”
Once the shelter is created, have students plant seeds and set determined intervals to measure their plants’ growth. If some plants are growing more than others, allow students to tweak their designs. Does their plant need more light to grow? Is it being watered too much? Ultimately, the inquiry should be student-led.
After a period of time, bring in the math by graphing the plant growth! Have students share what designs they think were most helpful to their seeds and which they would change in the future. Optimal plant growth is not an exact science, but we can get pretty darn close!
5. Compare & Contrast Plant Growth
Once students have a grasp on the basics of plant growth, it’s time to mix it up by exploring how different kinds of plants grow. Many succulents, for instance, can be propagated, and some plants, like ferns, don’t use seeds at all! How do these plants grow, then, if they don’t follow the basic cycle of seed to sprout to fruit?
It doesn’t just stop at seeds, either. Plants have different needs, too, usually based on their environment. A tree grows to become tall in order to stand out above other plants and access sunlight, while basal plants are perfectly happy close to the ground. With so many differences to consider, how can your students fully grasp plant growth?
It’s time to bring in the research! Break your students up into groups and assign each group a specific type of plant, such as ferns, pine trees, cacti, Venus fly traps, and so on. The goal here is to use “unique” plants–while surely all plants are unique, you want your kiddos to focus on those that deviate from the stereotypical seed, sprout, fruit cycle.
Allow your students time and resources to research their plants, focusing specifically on growth. Ferns use spores to begin their next life cycle, while cacti need much less water than other plants for their growth needs to be met. Once students have collected enough information, it’s time to share with the rest of the class!
Brainstorm all the comparisons and contrasts you can find as a class between every group’s plants. Every plant needs water, but how much? Similarly, all plants start their growth cycle somewhere, but is it as a seed or something else? There are a huge variety of factors for plant growth, both similar and not.
Plant growth is a fascinating topic that lends itself well to other units, too, such as adaptations and photosynthesis. With so much diversity in Earth’s flora, it’s only natural that there’s plenty of room for conversation here! Just please, be careful to keep your students engaged and excited about plants. We don’t want any monotonous professors and boring botany lessons.
Thankfully, plant growth is easily explored with these hands-on activities. There are plenty of opportunities to get your hands dirty and plant the seeds of knowledge in your classroom! Before long, you’ll be able to compare plant growth to your students’ growth, too, with all the learning they’ll be doing!
Bad jokes aside, I’m looking forward to hearing more plant growth ideas! Feel free to share yours in the comments, and don’t forget to share this post with a teacher friend so their learning can bloom, too!


