


COPYRIGHT © 2016-2026. The Owl Teacher | Privacy page | Disclosure Page | Shipping | Returns/Refunds
If you’ve ever taught mixtures and solutions, you know it can get… well, messy. Water everywhere, substances scattered across desks, and that inevitable moment when someone decides to test if they can make a “super solution” by combining everything on their table. But here’s the thing: when you are trying how to teach mixtures and solutions, it doesn’t have to mean chaos in your classroom!
Today, I’m going to show you how to use a variety of mixtures and solutions activities to help your students understand this tricky science concept in a way that’s engaging, hands-on, and (dare I say it?) relatively mess-free. Let’s dive in!
Why Mixtures and Solutions Can Be Tricky
Before we jump into the activities, let’s talk about why this topic can be challenging for upper elementary students. The concepts themselves aren’t too tricky. It’s helping students see the difference that can be tough.
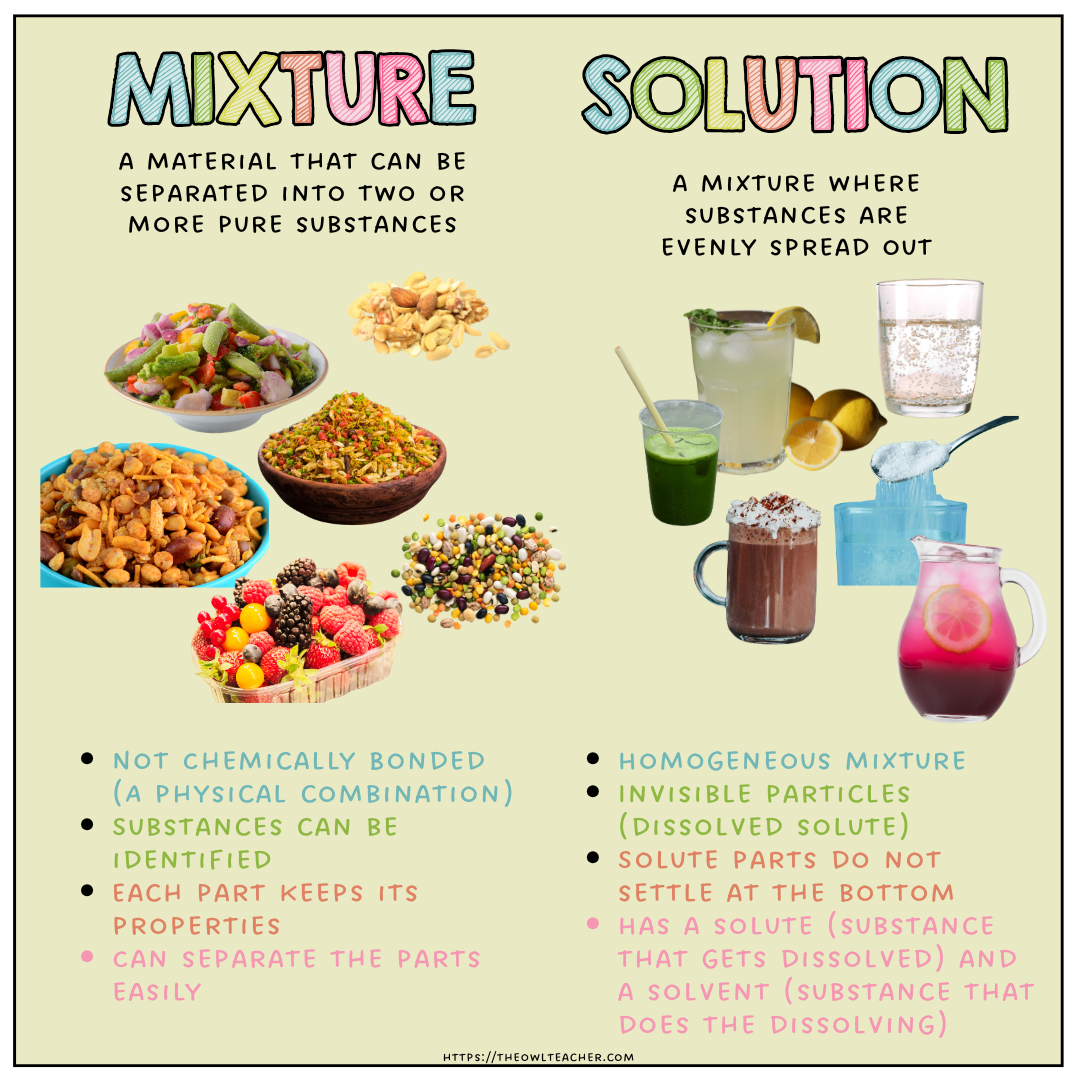
What is a Mixture?
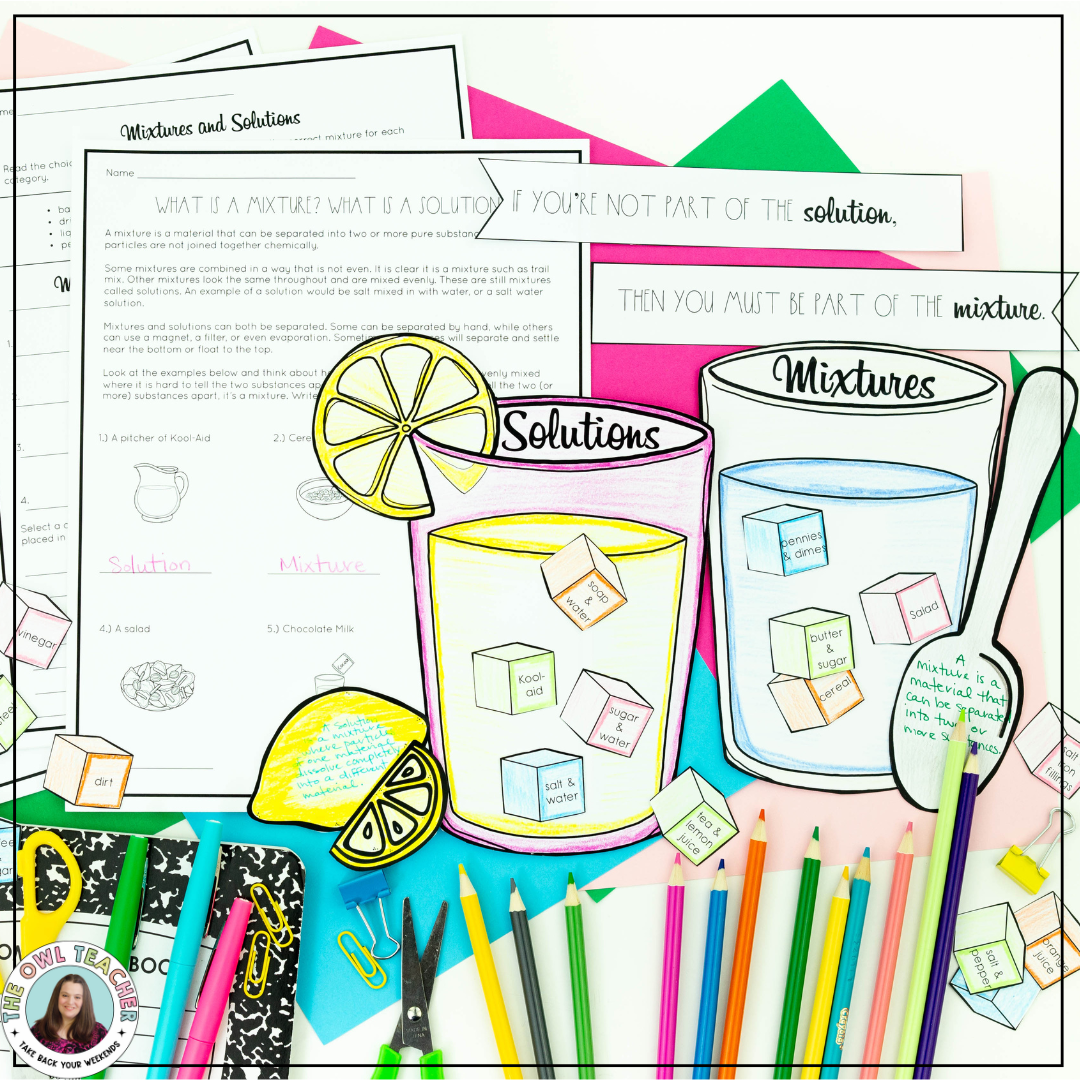
A mixture is a material that can be separated into two or more pure substances. These particles are not chemically bonded together. Think of it this way: when you toss together a salad, you can still see (and pick out!) the individual lettuce leaves, tomatoes, and cucumbers. That’s a mixture!
Some mixtures are combined unevenly. They’re mixtures, like trail mix, where you can easily spot the chocolate chips, pretzels, and peanuts. I love using trail mix as an example because, let’s be honest, who doesn’t want a snack during science class?
What is a Solution?
Here’s where it gets interesting. Other mixtures look the same throughout and are mixed evenly. These are still mixtures, but we call them solutions. An example of a solution is salt mixed with water, or a saltwater solution. You can’t see the salt anymore, but it’s definitely still there! (Your students can taste-test to prove it—with your permission, of course.)
The key thing to remember? Both mixtures and solutions can be separated. Some can be separated by hand, while others can use a magnet, a filter, or even evaporation. Sometimes substances will separate and settle near the bottom or float to the top.
The Simple Sorting Activity
Before you break out any materials, start with a simple classification activity. I love to present students with everyday examples and have them determine whether each one is a mixture or a solution. This gets their brains thinking without any setup!
Here are some examples to get you started:
- A pitcher of Kool-Aid – Solution (evenly mixed, hard to see the individual particles)
- Cereal and milk – Mixture (you can clearly see both components)
- Marbles, nails, screws – Mixture (definitely not chemically combined!)
- A salad – Mixture (easy to separate the parts)
- Chocolate Milk – Solution (evenly distributed throughout)
- Bottle of soda – Solution (the carbonation is dissolved in the liquid)
Have students discuss with a partner why they think each example belongs in its category. The conversation alone will help solidify their understanding! For more ideas on getting students engaged in science discussions, check out my post on Creative Ways to Make Science Engaging & Memorable.
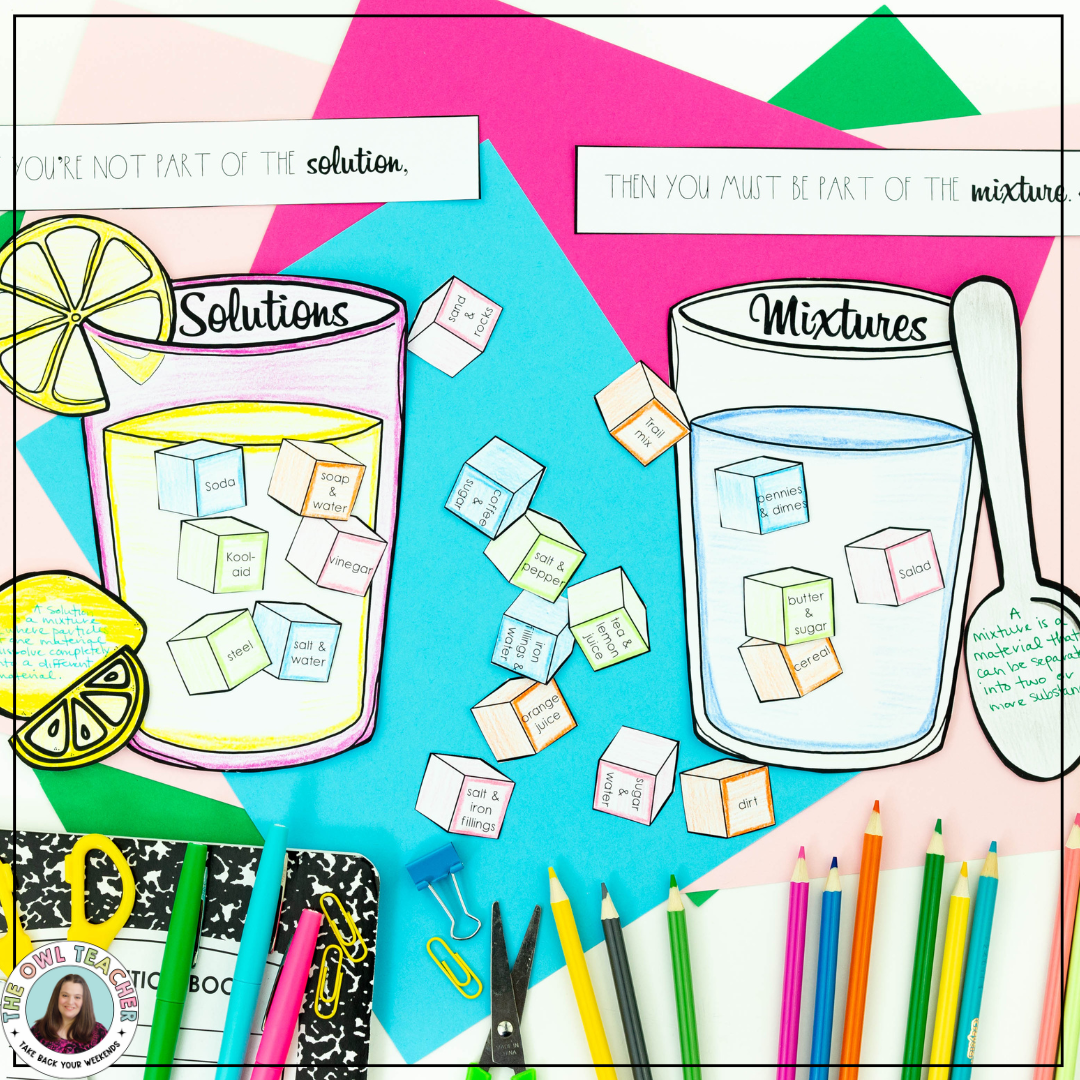
The Mixtures and Solutions Craftivity
This is where the magic happens! Instead of creating actual mixtures and solutions (and the inevitable cleanup), students can demonstrate their understanding through a craftivity that’s just as meaningful.
Sorting Real-World Examples
Provide students with a word bank of different combinations and have them categorize each as either a mixture or a solution. This reinforces the key concepts without requiring a single beaker!
Word Bank Examples:
- bananas and grapes
- drink mix and water
- liquid dish soap and water
- pebbles and soil
- air
- lemonade
- spaghetti and meatballs
- sand and water
Students create two categories on their paper or in their science notebooks and sort each item accordingly. The beauty of this activity? No cleanup, but plenty of critical thinking!
Of course, you can save yourself some time and just grab this Mixture and Solutions Craftivity that has everything you need, including practice pages. You can grab this resource here.
Teaching Separation Techniques (The Really Cool Part!)
Once students understand the difference between mixtures and solutions, it’s time to explore how we can separate them. This is where students get to think like real scientists!
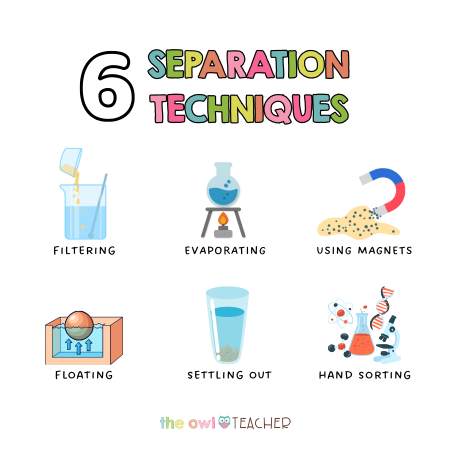
The Six Separation Techniques
Present students with these six techniques and help them understand when each one would be most effective:
- Filtering – Great for separating solids from liquids
- Evaporating – Perfect for getting a dissolved solid out of a liquid
- Using Magnets – Ideal when one substance is magnetic
- Floating – Works when substances have different densities
- Settling Out – Happens when heavier particles sink over time
- Hand Sorting – The simplest method for larger, visible pieces
The Prediction Challenge
Now here’s where it gets really engaging! Give students a list of different mixtures and have them predict which separation technique would work best for each one. They need to justify their answers by describing the materials’ properties.
Example Scenarios:
- Lettuce and tomato salad – Hand sorting (the pieces are large and easy to separate)
- Iron nails and sawdust – Using magnets (iron is magnetic, wood is not!)
- Sand and rice – Hand sorting or filtering (different sizes and shapes)
- Clay and water – Settling out or filtering (clay particles will eventually settle)
- Salt and water – Evaporating (the water evaporates, leaving the salt behind)
This prediction activity encourages students to think about the why behind each technique, not just memorize facts. That’s the kind of critical thinking we want! If you’re looking for more ways to build these scientific process skills, check out my post on Activities to Help Teach Scientific Process Skills.
Making It Hands-On (Without the Mess)
I know what you’re thinking: “But students need hands-on experiences!” And you’re absolutely right! Here are a few low-mess ways to incorporate hands-on learning:
The Observation Station
Set up a station at the back of your classroom with sealed containers showing different mixtures and solutions. Students can visit during early finisher time or as part of science centers. They observe and record which substances are mixtures versus solutions without ever opening a container. Label each container with a number, and students can keep an observation log in their science notebooks.
The Virtual Simulation Option
Sometimes the best “hands-on” experience is actually virtual! There are excellent online resources where students can experiment with mixing different substances and separating them using various techniques. PhET Interactive Simulations offers fantastic science activities that let students explore concepts without any materials prep on your end. For more ideas on using technology in science, you might enjoy 7 Quick & Easy Ways to Prep Science Activities.
The Demonstration Approach
Here’s my secret: you don’t need every student to create every mixture and solution. Instead, set up a few key demonstrations for students to observe and record data. For example:
- Show how oil and water don’t mix (mixture)
- Dissolve sugar in water (solution)
- Separate iron filings from sand with a magnet
- Filter coffee grounds from the coffee
Students get the visual learning they need, you maintain control of the materials, and cleanup is minimal!
What About Assessment?
Throughout this unit, you’ll want to check for understanding without relying solely on a written test. Here are some creative assessment ideas:
The Real-World Connection Challenge
Have students look in their fridges at home and identify five mixtures and five solutions. They can photograph them (with parent permission) or draw and label them. This connects science to their everyday lives and shows you whether they really “get it.”
The Separation Technique Presentation
Students choose one separation technique and create a short presentation or poster explaining when and why they’d use it. They need to include at least two real-world examples. This shows a more profound understanding beyond mere memorization of definitions.
The Science Writing Prompt
Use a quick writing prompt as an exit ticket: “Explain to a younger student the difference between a mixture and a solution. Use at least two examples in your explanation.” This combines science content with communication skills! For more ways to integrate writing into science, check out 5 Ideas on How to Integrate Writing into Science.

Areas That May Need Clarification in How to Teach Mixtures and Solutions
When teaching mixtures and solutions, I’ve found that students often need extra support in these areas:
- Understanding “Evenly Mixed”
Students sometimes think that if they can’t see something anymore, it’s gone. Help them understand that in a solution, the particles are still there—they’re just distributed evenly throughout. The salt didn’t disappear when it dissolved; it’s just too small to see now!
- Recognizing All Types of Mixtures
Students might not realize that air is a mixture of gases, or that some metal objects are alloys (mixtures of metals). Broadening their understanding beyond just “solid things mixed” helps them see science in everything around them. For more information on mixtures in our everyday world, check out Science Buddies’ lessons on mixtures.
- Choosing the Right Separation Method
Students often struggle with understanding why one method works better than another. Give them lots of practice thinking about the properties of materials. Does one have a different size? Different magnetic properties? Different density? These properties determine which separation technique will work best.
- Making It Meaningful
At the end of the day, we want our students to see science all around them. Mixtures and solutions aren’t just vocabulary words—they’re the lemonade they drink, the salad they eat, and the sand and water they play with at the beach.
By using craftivities, thoughtful discussions, and strategic hands-on experiences, you can teach this concept without turning your classroom into a science lab disaster zone. Your students will learn just as much (if not more!) and you’ll actually have time to eat lunch instead of cleaning up.
Remember: science doesn’t always have to be messy to be memorable. Sometimes the most powerful learning happens when students have time to think, discuss, and connect concepts to their world—no mop required!
Want more science teaching ideas that won’t take over your entire day? Check out my post on 12 Reasons to Make Time for Science TODAY to get inspired!
Ready to transform how to teach mixtures and solutions in your classroom? Try these proven techniques that prioritize understanding over cleanup.
Your Turn!
What are your favorite ways to teach mixtures and solutions? Do you have any tried-and-true activities that work well in your classroom? I’d love to hear your ideas in the comments below!
And if you found this post helpful, don’t forget to share it with a teacher friend who might be tackling this unit soon. We’re all in this together!
Happy teaching! 🦉

Looking for more science resources? Visit The Owl Teacher for lesson plans, activities, and teaching tips that make science easier and more engaging for upper elementary students!