


COPYRIGHT © 2016-2026. The Owl Teacher | Privacy page | Disclosure Page | Shipping | Returns/Refunds
I inherited a wooden easel long ago when I first began teaching. It was fabulous and worked well, but after many years of use, it began falling apart. Because I used my easel for reading workshop, writer’s workshop, math workshop, and science workshop, I needed an easel. I needed an easel desperately! Originally, I never would’ve considered a DIY easel, but…
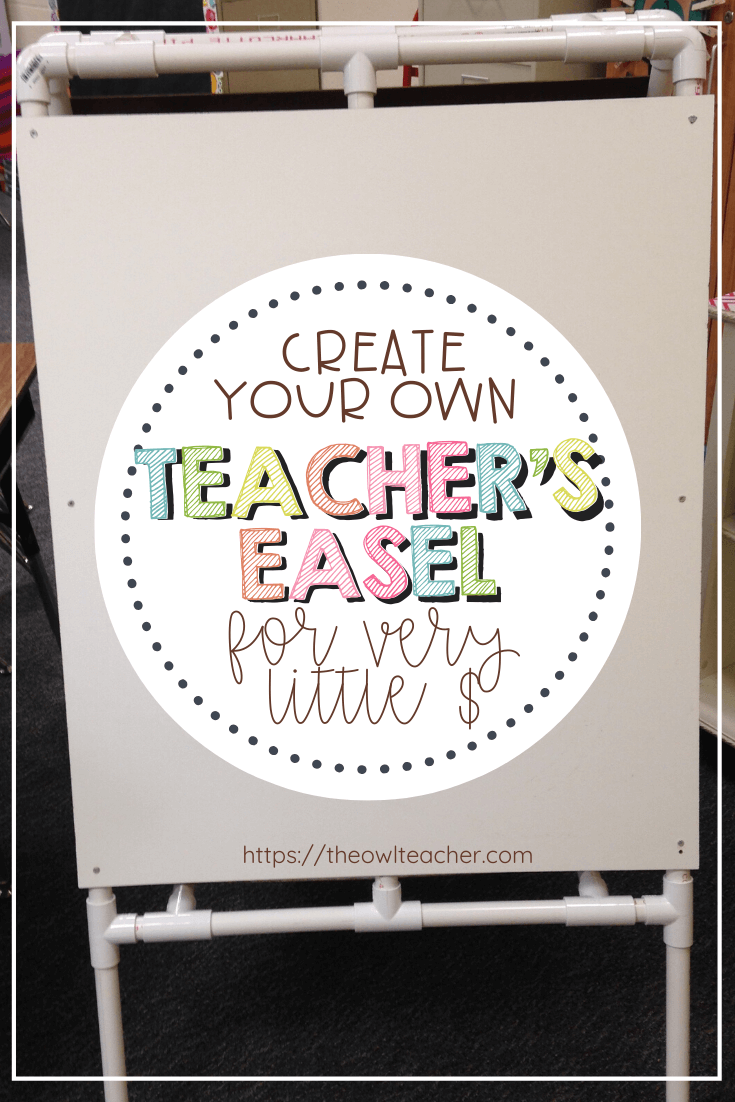
After spending hours cruising Amazon and other school supply stores, I had no luck. Oh, I saw easels, just not easels I wanted to pay for. What teacher has $300+ to spend on an easel?
It wasn’t that long ago I saw an idea on Pinterest that created a mini-anchor chart out of PVC piping. I absolutely loved it, and my husband quickly put one together for me! That’s when it hit me… If my husband could easily make that, what else could we make out of PVC pipes? Could he make me a DIY easel too?
You won’t believe it… he did it!! He’s amazing! And the best part? It was waaaaaaaaaaaaay cheaper. It cost about $25 total!
Creating the DIY Easel For Your Classroom
Before you purchase these parts individually, please read the post entirely. We bought longer pieces of piping that we could cut up into the smaller quantity described below (kind of like when you buy bulk and break it up into servings). I can’t remember how long those pieces were, but my husband believes they were quite a few feet that he cut up and that is why I mentioned cutting them up in Step 1.
Materials needed:
|
Detail #
|
QTY.
|
Description
|
Size
|
|
1
|
6
|
PIPE
|
0.75 x 36.0
|
|
2
|
2
|
PIPE
|
0.75 x 28.0
|
|
3
|
4
|
PIPE
|
0.75 x 12.0
|
|
4
|
8
|
PIPE
|
0.75 x 8.5
|
|
5
|
10
|
PIPE
|
0.75 x 2.25
|
|
6
|
16
|
TEE
|
0.75
|
|
7
|
4
|
90° ELBOW
|
0.75
|
|
8
|
4
|
CAP
|
0.75
|
|
9
|
2
|
DRY ERASE BOARD
|
33 x 28 x 0.125
|
|
10
|
1
|
SHELF
|
25 x 21 x 0.125
|
|
11
|
4
|
SHOWER RING
|
How To Read the Materials Chart:
The first number in the size box is the diameter and the second number is the length in inches. For example, the first pipe is 3/4 diameter (or 0.75) and 36 inches long. On the dry erase board and shelf, the first number is the length, the second is the width, and the last number is the thickness (but the thickness will vary based on the manufacturer).
The piping with thicker sidewalls works best. He used something called TrueFit System. These fit snugly, so there’s no need for glue.
DIY Easel Directions:
Step 1:
Cut all your pipe to the size necessary (see materials). He cut largest to smallest, but the order doesn’t matter. You can use a hacksaw to cut it, but my husband recommends using a PVC pipe cutter because it’s much easier and faster.
Step 2:
Assemble the front and back sides of this DIY easel. It should look like the picture below when done. Being a designer, he was able to whip this together on his designing software first. The numbers match the materials list.


Step 3:
Assemble the front to the back (see picture below).


Step 4:
Attach the dry erase board with sheet metal screws. If you purchase your dry erase board from Home Depot, they will cut it to size for you. You will have to buy a 4×8 sheet. Since there is leftover dry erase board, use the extra to create the bottom shelf.

Step 5:
Add the shower rings to the top of the easel around the PVC to hold your chart paper or pocket charts!

I love my new easel. The only thing I would modify is I would ask my husband to design a way to fold it down if needed. That’s the only disadvantage- but compared to $300+, beggars can’t be choosers. 🙂
Love DIY projects for your classroom? Check out these other ideas such as creating a DIY classroom calendar, DIY lunch tags, a DIY bingo review game, and other DIY teacher hacks.

37 Responses
WOW! This is fantastic!!
Thank you!!
I love this idea. I will be a first time teacher this fall and in dire need of an easel. I am planning on making one this week. How many pipes did you buy?
My husband bought 3 long pieces and cut it up into the various sizes needed. I think he had some left over too. Good Luck! 🙂
If you have a ikea they sell them for 15 dollars. Just a quick idea.
This is great! The easel I had in my classroom was too tall for me so I gave it away 🙂 Thanks for sharing.
Thanks for checking my blog out! 🙂
What kind of shower rings did you use to hold the chart paper up?
2 inch circular rings. 🙂
Thank you!!! I can't wait to make it!!!!
Thank you for the post! My husband made this for me and I absolutely love it. Plus, we were able to get small white boards and whisper phones out of the leftover pieces. Thanks, again! 😀
That is awesome! Don't you love great deals like that!
This is fantastic! I am hoping to convince my husband to make this for me tomorrow! I am wondering if you can attach wheels some how!
What a great idea!! Let me know if it works!
What type of board is this? I looked on HD and see different options. Thanks
We think it's this one:
EUCATILE
Model # HDDPTW48
Internet # 205995949
Store SKU # 346428
32 sq. ft. 96 in. x 48 in. Hardboard Thrifty White Tile Board
(It's been a while!) This board requires you to clean it right away with baby wipes or water because if it's left too long it becomes harder to take off. However, any dry erase board would work as long as it's the same dimensions- it just may cost a bit more.
OK THANKS
It's bushed the main points. The router may be a versatile trade tool which will be used for a range of tasks together with rabbeting and creating dado grooves.
Truly the best thing of school I never got such information before this thanks. click to read more
What are the dimensions of the pvc pipe once it was cut? And how big did you cut the white board?
Hi Allison! Thanks for asking. The pvc pipe dimensions would depend on which piece you are asking about. In the blog post, I created a chart with the dimensions for each piece needed and how many needed. The first number is the diameter and the second number is the length. The dry erase board is 33 inches in length and 28 inches in width and .125 in thickness (though that really isn’t as important- it’s more based on manufacturer). If this still doesn’t help or you aren’t understanding the chart- email me and I’ll definitely help you out more! 🙂
My husband and I just made mine last night. We had to adjust some measurements due to using a dry-erase board I bought on clearance. Thank you for sharing your plans!
I’m really glad it worked out! 🙂
Thank you so much for the amazing plans!! My Dad helped me make the easel last week and I love it. Can’t wait to use it this school year. Your plans were incredibly detailed and easy to follow. We only made one change… we used rubber caps for the feet so that it won’t slide around as much.Thanks again!!
I went to by the PVC pipes and when I priced it out it was closer to 180$. How did you buy all of those pipes for only 25$???
We bought one or two long pvc pipe pieces (my husband says he thinks they were like 6 or 8 feet long, but it’s been a while) and we then cut it into many pieces based on those sizes in the chart. In step one, we describe cutting to those sizes. I didn’t realize that I never mentioned that part in the post. That’s strange that people have saved money without me mentioning that! I’ve had people say that they have saved money and the most I have ever heard any has spent was around $40. I will fix that right away. Thank you for pointing that out to me! I’m sorry for the confusion! I hope that helps, and if you have any more questions, please let me know!
I just bought my pvc for this project. The pipes I got at home depot were 10 feet long. I bought four and after cutting everything have almost 6 feet left on one pipe (which is good in case I messed anything up !). They cost about $2.25 each. The t-connectors and caps are fairly inexpensive and most of those items can be purchased in a bulk bag, ranging from 10 to 2 per bag for only a few dollars. Individually they are under $1 each.
Can’t wait to finish this project! Thanks for posting!!!
Can you post a link for the dry erase board or send me a link? I wasn’t aware you could buy dry erase board like that?
My hubby went to Home Depot and actually requested a Dry Erase (or Marker Board) to be cut to that desired size. You can also use a shower board too. If you search online for those specific dimensions you will struggle finding them because it was custom made. I hope that helps. It doesn’t take but a few minutes to just have them cut it for you at a local home improvement store. 🙂
How can we add bins in between the boards? Also, how one would put wheels on the bottom? As well how can I make it fold to easily carry around?
That’s the part we haven’t figured out yet is folding it. The adding bins, you can just place them on the shelves. For the wheels, you would just insert castors in the bottom instead of the caps. 🙂
This is really awesome! What a great project for my husband who loves time in his man cave!
Thank you for this!! Just put mine together and it is PERFECT!!
How did you attach the whiteboards to the PVC pipe?
We used screws and a drill. 🙂
Thank you!! This was so easy to put together- your directions & diagrams rocked. Can’t wait to use it in my classroom! 🙂
I bought a cheap ($10-$15) garment rack at Dollar General. I put it together according to the instructions and didn’t need to buy or cut anything else. I thought about doing this, but I would have to spend more money for the tools.